Friday, November 30, 2012

More Racer Group 5 Models in 2013

Encouraged by the brisk sales of the 1/32 Ford Capri and Lancia Beta Group 5 "Sideways" cars, RACER have announced the intention to expand their Group 5 offerings with previously unannounced decorations of the BMW M1 and the Porsche 935 and 935L.

Racer's newly announced liveries will include Preston Henn's 1983 Daytona 24 hours 935 "Moby Dick" driven to a dominant victory by "Brilliant" Bob Wollek, Claude Ballot-Léna, Preston Henn and A. J. Foyt Jr. sponsored by Henn's T-Bird Swap Shop. Foyt was added to the team after his originally-assigned Aston-Martin Nimrod expired around the 12 hour mark. The Daytona triumph was the last International endurance victory for a Porsche 935.

Porsche 935L IMSA 0027 (prototype)


Also planned from RACER are these additions to the Group 5 line which will be all new tooling (actual race car photos shown).

Toyota Celica Group 5 0032

Ferrari 512BB 0033

Nissan Skyline Group 5 0031


Lancia Stratos Turbo 0030

My best guess is that the first of this newest Group 5 series will arrive in the shops late 1st Quarter 2013

Tuesday, November 27, 2012

New 1/32 Cheetah Versions From Carrera


These should be at your local hobby shop this week...


Photos by D. Kennedy 

Wednesday, November 21, 2012

Carrera 1/32 Shelby Cobra 289


Shelby Cobra 289 available from Carrera in both D132 and EVO.

Photos by D. Kennedy

Sal Tovella Stock Car Coming in 1/32 from Carrera


The Plymouth Superbird driven in USAC stock car racing by Sal Tovella, coming from Carrera in both D132 and EVO. My research shows this to be the car run by Sal at The Milwaukee Mile July 9, 1972.

Photos by D. Kennedy

Porsche 917K Coming in Carrera D124


Carrera's Porsche 917K "1st Daytona 1971" J. W. Engineering Oliver / Rodriguez No. 23777 expected in North America before the end of the year.

Photos by D. Kennedy.

Monday, November 19, 2012

“On the Road” with M.G. Brown

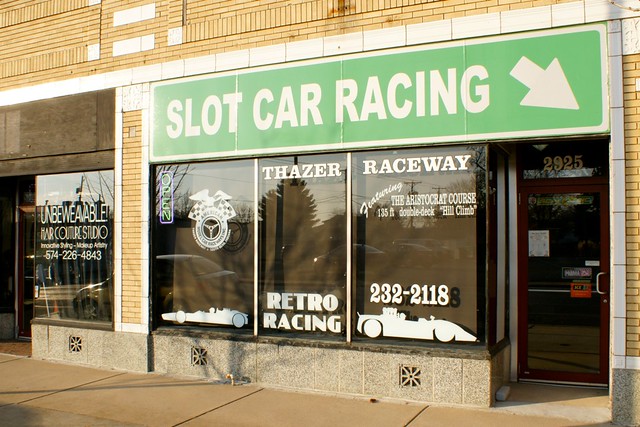
For this installment of “On the Road” we visit Thazer Raceway in South Bend Indiana.

Thazer Raceway has been in operation in Northwest Indiana since the mid 1970’s and has one of the few remaining American Raceways commercial tracks set up and in operation in North America.

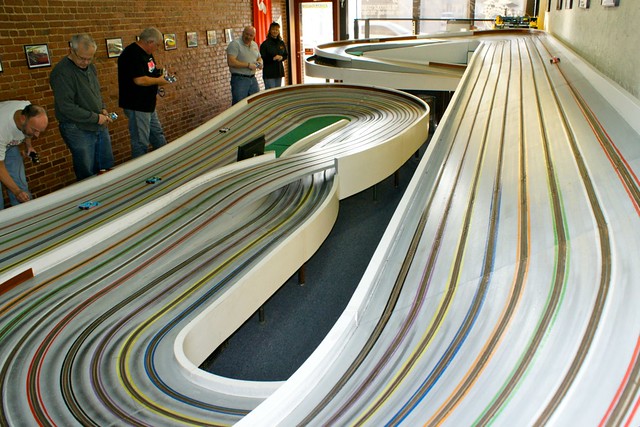
Thazer’s track is the 135 foot “Aristocrat”; owner Dave Geerhing has nicely framed copies of American Raceways catalog illustrations, showing not only the Aristocrat, but other American Raceways tracks, decorating the walls of the raceway. On the "back" wall there are a number of nicely reproduced and framed examples of the great box art that was a part of the Revell kits of the 1960’s.

The Aristocrat track features the original American Raceways style drivers panels and is largely original with the exception of being resurfaced, re-wired, re-braided and having some minor repairs in the last few years. One of the interesting features of the Aristocrat is that in two places on the track, the inner and outer 4 lanes “cross over”. It takes some getting used to driving a track like this when all 8 lanes are operating.

Thazer has a modern PC-based race director system and modern power supplies, but the original American Raceways lap counter and power supply / time seller are on display above the parts counter. All I can say is, “my how times have changed”.

In addition to the parts that you would expect from contemporary 1/24 slot car companies such as Parma, Champion, Outisight, Red Fox, etc., Thazer has a good stock of 1/32 RTR’s and parts from Scalextric, SCX, Slot.it, and Racer/Sideways. They have rental cars and controllers available as well as track time if you have your own "stuff".

The surrounding area reminds me of the sort of middle class neighborhood that most slot car raceways that I ran at in my youth were located. While you're at Thazer, It’s easy to imagine yourself back in a more innocent era of sock hops and rock and roll.

I certainly had a lot of fun visiting with Dave at Thazer raceway- I’d encourage you to break out your vintage 1/24 race cars and visit some weekend too.

Thazer Raceway
2925 Mishawaka Ave
South Bend, Indiana
46615
574-232-2118

Tuesday, October 23, 2012

Hardbody How-To With Brian Meharry (Part 3)

Part Three - Body Finish and Drive Train Assembly

Most of the time I cut my own designs out of masking tape, but I found some nice 1/24 Parma paint masks that I thought would suit this car well. I'm going to keep the black plastic on the front of the car. I use blue masking tape to cover the area the pre cut mask doesn't cover.


After the paint dries, peel off the mask and recover from the paint fumes for a while...
I like the clean look of water slide decals, but the Lazy 8 is high speed and I've found that vinyl decals cut with an exacto knife hold up much better over time. These are Slixx Decals that sadly have been out of production for some time. Some raceways still have some left so ask and you might get lucky.

I rattle can sprayed a light coat of Tamiya TS Gold on the interior and layed some one-shot poster paint on with my artists brushes. With interiors, practice makes perfect.


Scribble scrabble with a fine black sharpie marker to bring out the details. Taking the time to detail a realistic interior makes the whole car look better I think.

I know this is a drag interior, I like this driver figure because he looks like he has a beer gut. I'm easily amused.
While I allow the clear coat applied on the body to dry I assemble the rest of the parts that make this thing go. 

The important thing is to bend the motor bracket down about 10 degrees on the chassis. the back of the motor should be at the top of the bracket, and the front should be on the chassis. Use of the angle tooth pinion makes it possible to obtain a smooth gear mesh in this set up. I opted not to brace this car. Mostly because I plan not to hit anything...not hard anyway.


The windows can be secured with your adhesive of choice- watch crystal cement or shoe goo (clear) are two popular choices. 

I clear coated the body with 3 very wet coats of future floor wax; after it was dry (usually overnight is best), I mounted the interior with strapping tape, and secured the body to the chassis with thin strips of velcro. You can use Parma's FCR body mounts or cut your own. I can't wait to get it out on the track.

Thanks to Brian Meharry for this informative how-to. If you have questions for Brian, you're invited to post them on the Mid-America Hardbody Racing Series page on Facebook.


Sunday, October 21, 2012

Hardbody How-To With Brian Meharry (Part 2)

Part Two - Body Assembly and Reinforcement

Strip styrene; it's inexpensive and comes in many different shapes and sizes. I feel that it's probably the most overlooked building component in hard body racing. I use .020 thick plastic because it is strong, flexible, and fairly light weight.

I use a medium thickness super glue to tack parts in place. It's good to use an acc- elerant such as "zip kicker" so that the glue dries instantly. For final assembly of the hood, bumper and grills, I use a generous amount of contact cement.

It can't be stressed enough to take your time assembling the body and adding re-enforcement. I use .020 strip and sheet styrene that I buy at my local hobby shop. The purpose of using this is to back up and strengthen the assembled body against impacts during racing. Accidents do happen in racing, but my cars usually last a very long time because I take the proper steps.
Additional reinforcing tabs help secure the front bumper or nosepiece depending on the type of car that you're building.
I was actually satisfied with how the rear bumper fits to the body straight from the kit, but I decided to add small tabs on each side to make sure it stays in place.

Here's the view from underneath once I assembled the body with contact cement.
Once I have assembled and glued the major body parts into place, I secure them tighty with tape and allow the glue to dry at least overnight. The purpose of the tape is to insure that the adhesive doesn't expand and separate the joints.

That's it for now, let's work on finishing the body and putting in the drive train next time.


Stay Tuned to Slot Car News for Part Three of Brian's Hardbody How-to.  

Racers be sure to check out the Mid-America Hardbody Racing Series page on Facebook for race dates and more information.